


This tutorial is part of our QGIS tutorial series:
- QGIS 3 Plugins - Plugin 101
- QGIS 3 Plugins - Qt Designer Explained
- QGIS 3 Plugins - Signals and Slots in PyQt
- QGIS 3 Plugins - Geocoding with Nominatim Part 1 (First Steps)
- QGIS 3 Plugins - Geocoding with Nominatim Part 2 (Interactivity)
- QGIS 3 Plugins - Geocoding with Nominatim Part 3 (Best Practices)
- QGIS 3 Plugins - Geocoding with Nominatim Part 4 (Tests & CI)
- QGIS 3 Plugins - Set up Plugin Repository
- QGIS 3 Plugins - Background Tasks
This tutorial follows you through the development process of a simple QGIS 3 Action.
Goals:
- Get more familiar with
QGIS3 Actionsand theHERE Maps Geocoder API - Generate random points in polygon
- Extend your table with an additional column which will be populated programmatically
- Upon executing the custom QGIS action a request is made to the HERE Maps API to reverse geocode the point data
Haftungsausschluss
Validity only confirmed for Ubuntu 18.04 / Mac OSX Catalina 10.15.x and *QGIS <= v3.12
- Basic understanding of Python
- Experience with QGIS3
- A freemium HERE Maps Developer Account to create your own API Key
Once you have opened your QGIS3 environment add a basemap of your choice (we recommend QuickMapServices).
Afterwards select EPSG:4326 as your project coordinate reference system and drag and drop the provided melbourne.geojson file into your map.
Note: You obviously could use any other polygon here.
Up next we will need to generate some random points in our polygon which we will use to reverse geocode in our QGIS action later on:
- Go to Vector / Research Tools / Random Points inside Polygons
- Select your input polygon layer (e.g. the melbourne polygon)
- Input your point count (e.g. 200) / you don't have to set the minimum distance between points
- We will save the output to a temporary layer
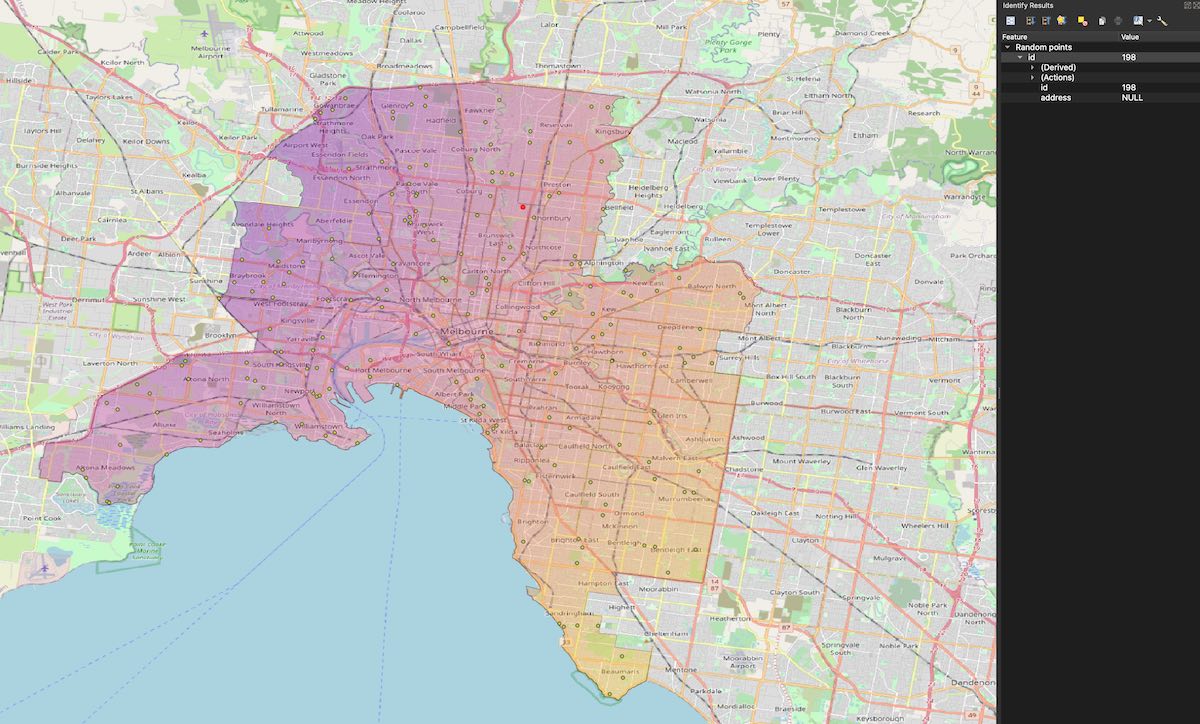
A temporary layer called "Random Points" should have been generated and you will be seeing the amount of points you selected in 3. in your polygon on the map. Our QGIS action will be created in a way which will consume this point data which will be sent to the HERE Maps Geocoder service. The response will be an address at that location which we will save to our temporary table.
To this end, we will have to add one additional column to this table:
- Right click the Random Points layer and select "Properties"
- Find the tab "Fields" and add a new field by clicking "toggle editing mode"
- Then select "new field" and in the dialogue you will have to give it a name, e.g. "address" and the type which in this case should be "Text, unlimited length"
- Afterwards hit "toggle editing mode" again and confirm your changes to be saved
The logic of the action will be invoked once a user has either selected it in the main toolbar and clicked a specific point feature in the layer or when a feature has been identified and the action has been clicked in the "Identify Results" tab.
- It will derive the feature's point geometry
- Then it will use its latitude and longitude to construct a request which will be fired against there HERE Geocoder Service
- The service will reverse the coordinates into an address which we will use to save in our temporary points table address column
Right click the points layer and select "Properties". Once opened, navigate to "Actions" and add a new action of type "Python" with a short description. The scopes of the action to be selected are "Feature Scope" and "Canvas" which define where and how this specific action can be invoked.
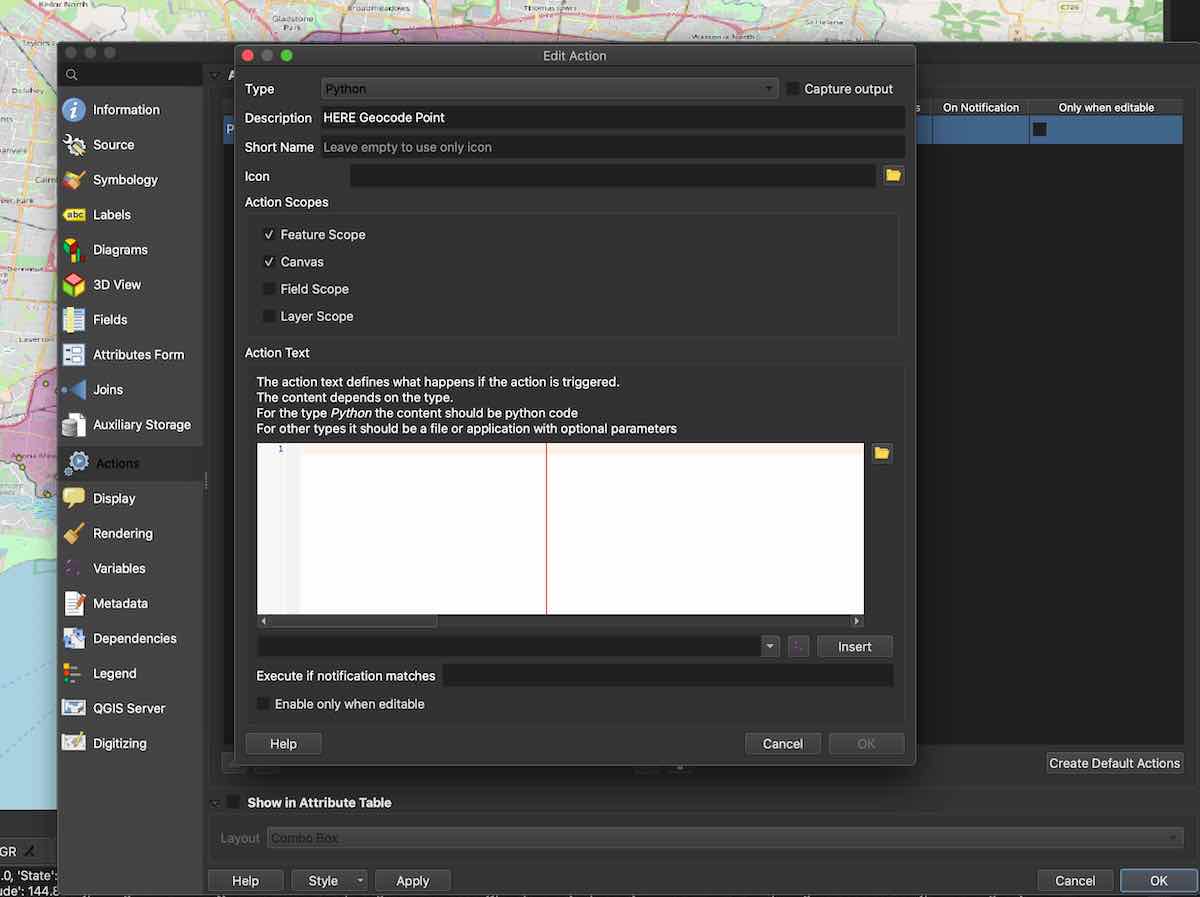
The script consists of multiple code blocks which we will break down for you in the following sections.
The "Action Text" is where we will write our Python code which will handle the aforementioned logic. First of all please paste the following into your import statements.
from qgis.core import QgsMessageLog
from qgis.PyQt import QtWidgets
from qgis.PyQt.QtCore import QUrl
from qgis.PyQt.QtNetwork import  QNetworkAccessManager, QNetworkRequest
import json
To make certain we have everything prepared and ready to make a request against the HERE Maps API please paste the following below.
here_api_key = 'insert_your_here_api_key_here'

our_layer = '[% @layer_id %]'
QgsMessageLog.logMessage("Selected layer ID is {}".format(str(our_layer)))

our_layer = QgsProject.instance().mapLayer(our_layer)

fid = [% $id %]
QgsMessageLog.logMessage("Selected feature ID is {}".format(str(fid)))

feature = our_layer.getFeature(fid)
point = feature.geometry().asPoint()
lat, lng = point.y(), point.x()
QgsMessageLog.logMessage("Selected coordinates are {}, {}".format(lat, lng))

manager = QNetworkAccessManager()
manager.finished.connect(handle_response)
We can make use of some nifty QGIS features here, namely some built-in functions to derive information of layers and features.
With @layer_id we can grab the layer id we are currently working in which is holding our points.
$id on the other hand provides us with the ID of the feature which was clicked to invoke this script.
We bring these 2 variables together and access the feature from the current layer which we then can use to extract the geometry.
Now and then we have added some log messages to help us debug which you can see when the script successfully runs ("View" > "Panels" > "Log Messages").
We will make use of the handy QNetworkAccessManager() class which will help us make our actual HTTP request.
By design it works asynchronously and doesn't run in the main thread, thus it won't block any other operation going on.
With the connect function we finally have to make sure the network manager knows which method should be called once the response is returned successfully (this is referred to as the callback function).
If you are interested to read more about this in QGIS3, we can recommend our tutorial on Signals and Slots.
Until this point we have the selected feature and its coordinates. We have also set up the network manager but what is missing is the actual request logic.
Let's append a line at the very end...
do_request(manager, lat, lng, here_api_key)And declare this new method which can sit right after the imports.
def do_request(manager, lat, lng, api_key):

    url = f'https://reverse.geocoder.ls.hereapi.com/6.2/reversegeocode.json?prox={lat}%2C{lng}%2C250&mode=retrieveAddresses&maxresults=1&gen=9&apiKey={api_key}'
    QgsMessageLog.logMessage(f'Making a request to {url}')

    req = QNetworkRequest(QUrl(url))
    manager.get(req)
Here we set the url for the HERE Maps geocoding service which uses our lat und lng variables as well as your HERE Maps api_key.
The request is created as a QNetworkRequest which takes the QUrl consuming our service url as its input.
Finally the manager makes the HTTP GET request to the REST service.
If you have followed carefully you will have noticed that the handle_response function is yet missing.
Try to execute the action in its current state and you will see that the request will be made.
However, the callback method won't be called because it doesn't exist yet, so let's add it.
def handle_response(resp):

    QgsMessageLog.logMessage(f'Err ? {resp.error()}. Response message : {resp}')

    response_data = json.loads(bytes(resp.readAll()))
    QgsMessageLog.logMessage(f'Response {response_data}')

    address = response_data["Response"]["View"][0]["Result"][0]["Location"]["Address"]["Label"]

    our_layer.startEditing()
    address_col= our_layer.dataProvider().fieldNameIndex("address")
    our_layer.changeAttributeValue(fid, address_col, address)
    our_layer.commitChanges()

    QtWidgets.QMessageBox.information(None, "Success", "Location has been reverse geocoded: {}".format(address))
A successful response with a coordinate reverse geocoded will yield a json object from HERE containing all different kinds of interesting information corresponding to these coordinates.
To keep this tutorial simple, we are only interested in the full text address which HERE Maps provides in the Label object of the response (check the log messages to get a full understanding of the JSON response from HERE Maps).
The response object holding this information is a QByteArray which we have to cast to bytes to make sure we can load it into a json object which we can access.
At long last we would like to save the result in our tempory table in the address column we added in the beginning.
To do so we have toggle the selected layer our_layer to make it editable and look for the index of the address column which we save to the variable address_col.
This will help us make sure we are changing the attribute for this column with the address the geocoding service returned.
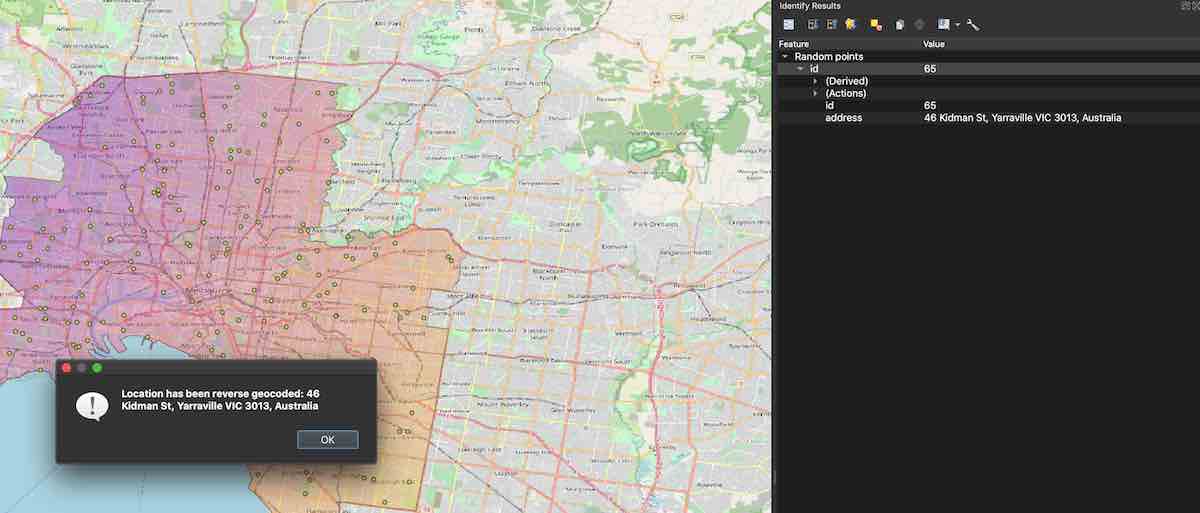
After the changes have been commited to the layer with commitChanges() we close the editing mode and finally a display box will open with the address from the service.
Note: not always will the HERE Geocoder service be able to return an address (e.g. adding points located in a waterbodies). Our current logic is quite lean and so far doesn't do any sophisticated error handling.
Since we declared our action to be scoped for the canvas and single features, there exist two places from where we can invoke the action:
- Canvas: you will see the QGIS actions icon in the top bar usually located next to the "Identify Features" icon.
- Single features: invoke the action from a selected feature in the "Actions" entry which is part the "Identify Feature" tab.
Once you have gone through all the steps above, you should be able to see something like this:
And your final action code could look like this:
from qgis.core import QgsMessageLog
from qgis.PyQt import QtWidgets
from qgis.PyQt.QtCore import QUrl
from qgis.PyQt.QtNetwork import  QNetworkAccessManager, QNetworkRequest
import json

def do_request(manager, lat, lng, api_key):

    url = f'https://reverse.geocoder.ls.hereapi.com/6.2/reversegeocode.json?prox={lat}%2C{lng}%2C250&mode=retrieveAddresses&maxresults=1&gen=9&apiKey={api_key}'
    QgsMessageLog.logMessage(f'Making a request to {url}')
    req = QNetworkRequest(QUrl(url))
    manager.get(req)

def handle_response(resp):

    QgsMessageLog.logMessage(f'Err ? {resp.error()}. Response message : {resp}')

    response_data = json.loads(bytes(resp.readAll()))
    QgsMessageLog.logMessage(f'Response {response_data}')

    address = response_data["Response"]["View"][0]["Result"][0]["Location"]["Address"]["Label"]

    our_layer.startEditing()
    address_col= our_layer.dataProvider().fieldNameIndex("address")
    our_layer.changeAttributeValue(fid, address_col, address)
    our_layer.commitChanges()

    QtWidgets.QMessageBox.information(None, "Success", "Location has been reverse geocoded: {}".format(address))


here_api_key = 'insert_your_here_api_key_here'

our_layer = '[% @layer_id %]'
QgsMessageLog.logMessage("Selected layer ID is {}".format(str(our_layer)))

our_layer = QgsProject.instance().mapLayer(our_layer)

fid = [% $id %]
QgsMessageLog.logMessage("Selected feature ID is {}".format(str(fid)))

feature = our_layer.getFeature(fid)
point = feature.geometry().asPoint()
lat, lng = point.y(), point.x()
QgsMessageLog.logMessage("Selected coordinates are {}, {}".format(lat, lng))

manager = QNetworkAccessManager()
manager.finished.connect(handle_response)


do_request(manager, lat, lng, here_api_key)
The final action code can also be found in our tutorial repository. Feel free to clone it and compare!